Rosemary and Seasalt Focaccia

IMG_20160629_193818_lznI have a new love. A summer-love so to say. It has occupied all of my heart and my thoughts and our relationship is getting better with every time we meet. And yes, it went fast, I mean I’ve only been home for a week. Congrats foccacia, you have conquered my heart and our family’s dining table and we will be truly faithful to you (until a new fave comes along, let’s be honest right from the start, ok?).

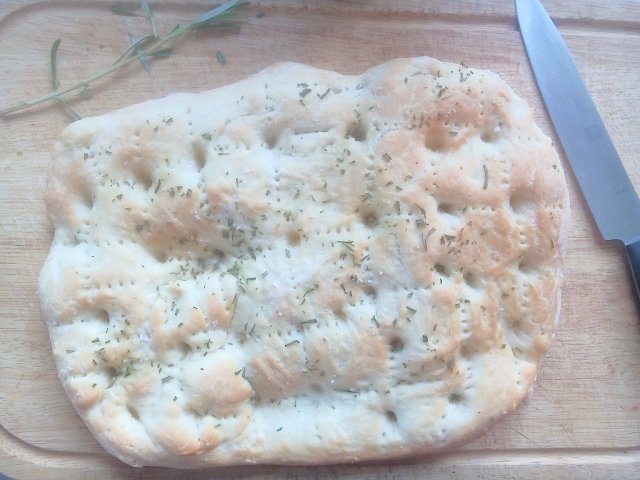
I just love this Focaccia. The crispy outside with the taste of olive oil and rosemary, the slight crunch of seasalt. The chewy interior that is as light and fluffy as you could dream of. The 15-minutes only kneading effort and then watching it rise (that does take some time though).IMG_20160629_193847_lzn

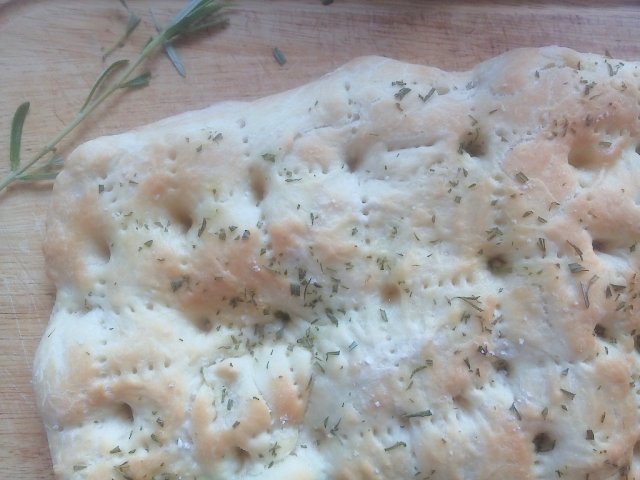
Let’s talk about patience for a minute. In relationships, you need to be patient with each other to allow the other to develop to it’s best, right? Same with this Foccacia. Yes, you could skip the second 40 minutes rise time and bake it directly. But then you would miss out on the ultimate experience, the highpoint of Foccacia so to say. And hey, you can just make it in advance and then sit next to it and watch it rise (or read a good book or something). It’s summer, so time to slow down a little bit and enjoy the little things in life, or life in general.IMG_20160629_194402_lzn

I hope you fall in love with this as much as I did!
With love from the student kitchen,
Johanna

Rosemary and Seasalt Focaccia

  • Servings: 4 as a side dish
  • Print

This is what you need
180 ml (3/4 cup) lukewarm water
1.5 teaspoons active dry yeast
1/2 tablespoon sugar
1 teaspoon salt
260 g flour (2 + 1/3 cups)
3 tablespoons good-quality olive oil
1 stick rosemary
1 tablespoon coarse sea salt (fleur de sel)
extra flour to coat your kneading surface (table etc.)

And this is how we do it
1. Stir water, yeast and sugar together and let proof for 5 minutes.
2. Mix water-mixture, flour and 1 tablespoon salt together and stir with a spoon until roughly incorporated. Flour the table and knead the dough with your hands on it for about 10 minutes. If the dough is tooo sticky you can add a little more flour just until it becomes manageable
3. Transfer the dough to a bowl that has a floured bottom. Cover with a clean cloth and let it rise at room temperature for 40 minutes.
4. After 40 minutes, punch down the dough and roll it into a tight ball, kneading a little bit more.
5. Let rise for 15 minutes.
6. After these 15 minutes line a baking sheet with parchment paper. Flatten out the dough with your hands into a rectangle. The dough should be 1 cm thick. Let rise for another 40 minutes.
7. During that time, strip the leaves of rosemary off the branch and cut them into small pieces.
8. After the 40 minutes are over, make holes into the dough with your index finger and poke into the in-between space with a fork as visible in the pictures below.
Preheat the oven to 175°C/350°F
9. Brush the olive oil on top of the dough, ensuring that there is some oil in every hole. (Using a brush works best). Sprinkle with rosemary and seasalt. Optional: sprinkle some more fine salt on top.
10. Bake for 30 minutes until the Foccacia is golden brown.

Pairs great with a fresh salad!

This is my own recipe. Please do not use it commercially without my permission. When using it on your blog, please re-write it in your own words and link it to the source to give proper credit:). Thanks!


Healthy Carrot Cake Oatmeal Cookies

P1070157_lzn
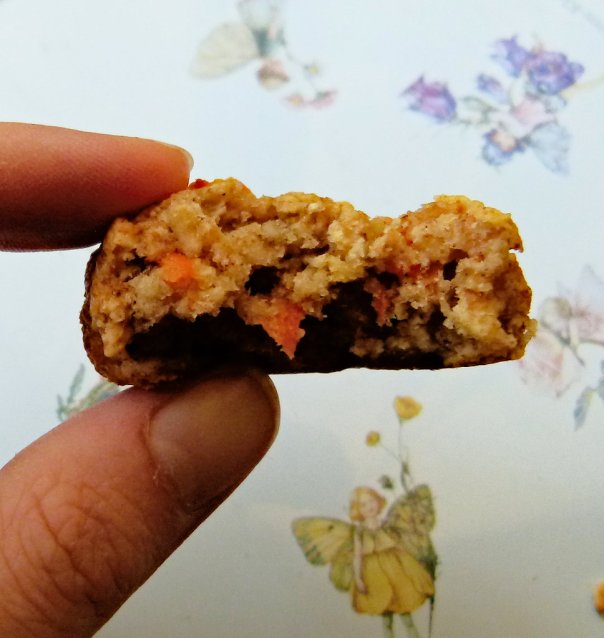
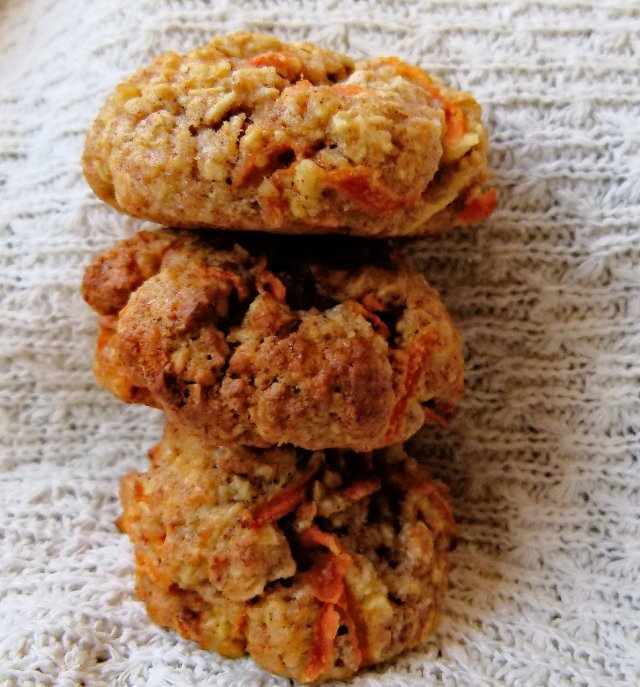
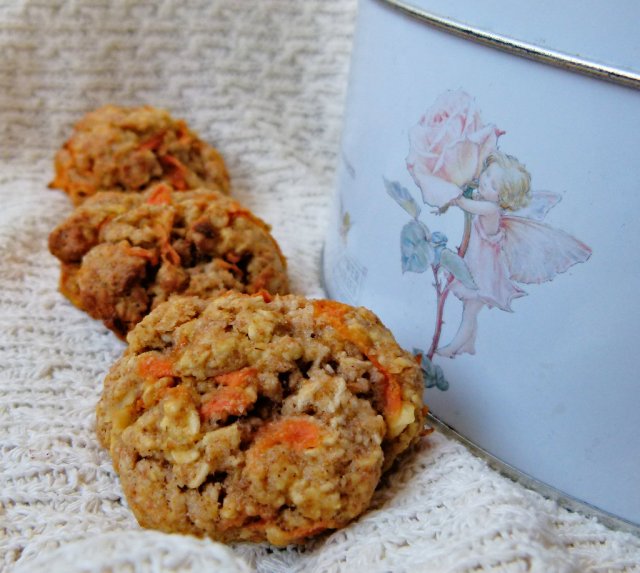
Healthy cookies. Nope, you have read it correct, these are healthy cookies. Shall I repeat again: healthy cookies. If you take apart the ingredients, they would be like your typical carrot cake oatmeal with a hard boiled egg by the side. Okay, I do admit there is some (ahem) sugar in them too, but it comes from honey, so we can count that one onto the healthier side as well, right?P1070153_lzn

My friend A and me were having dinner together (and studying) before exams and when she was about to leave, she decided to pass by her boyfriend’s house and bring him something. After all my suggestions were rejected, we came up with the idea of making cookies. Now, they had to be fast (she wanted to leave in half an hour), almost flourless (because my house, for once did not have cake flour), sugar-free (same problem) and well, good too (duh). A. said the dough looks like horse-fodder (comment of the boyfriend: “but it was nice horse-fodder though…)

I have had this recipe idea from Amy’s Healthy baking for quite a while now, so in the end, it came out to this. The advantage of using honey is way less chilling time (8 minutes in the freezer are enough), resulting in a thick cookie that is crunchy on the outside and very chewy on the inside. I ate all the cookies she left me (which is why there are only that few on the pictures, that was all that was left!).

P1070163_lzn
The dough is just melting the butter, mixing the liquid ingredients together, grating the carrot, stirring the dry ingredients into the wet ones and then in goes the carrot. The whole thing needs 8 minutes freezer time, then you can roll it into small balls, flattening them out with your palms a little, and place them onto a baking sheet lined with baking paper. After 15 minutes, they are already done.

P1070154_lzn

I thought they would get soggy the next morning but they didn’t. Just as good as the night before and guess what, I ate them for breakfast. Can you judge?

With love from the student kitchen,
Johanna

Healthy Carrot Cake Oatmeal Cookies

  • Servings: 20 cookies
  • Print

This is what you need
130 g instant oats
35 g whole wheat flour
35 g almond flour
1 1/2 teaspoons baking powder
1 1/2 teaspoons cinamon
1 pinch nutmeg
1 pinch salt
2 tablespoons butter, melted and then cooled
1 egg
1 teaspoon vanilla
100 g honey
1 medium carrot (70 g)

And this is how we do it
1. grate the carrot
2.  In a bowl, whisk together oats, flour, almond flour, baking powder, cinnamon, nutmeg and salt.
3. In a seperate bowl, whisk together the cooled butter (it should still be liquid), egg, vanilla and honey.
4. Add the wet ingredients to the dry and stir with a spoon until just incorporated into a moist dough. Stir in the grated carrots.
5. Freeze the dough for 8 minutes, during that time, preheat the oven to 180°C/350°F
6. Using a tablespoon, drop the cookies on baking sheets lined with parchment paper.
7. Bake for 12-15. minutes (they are slightly underdone after that time but they will continue baking on the sheets a little after you take them out).
8. Let them cool down on the baking sheets and enjoy!

Recipe idea from Amy’s Healthy Baking.
Cookies store in an airtight container for a few days.

Breakfast Quinoa with Mango Rhubarb Compote

P1070231_lzn-1
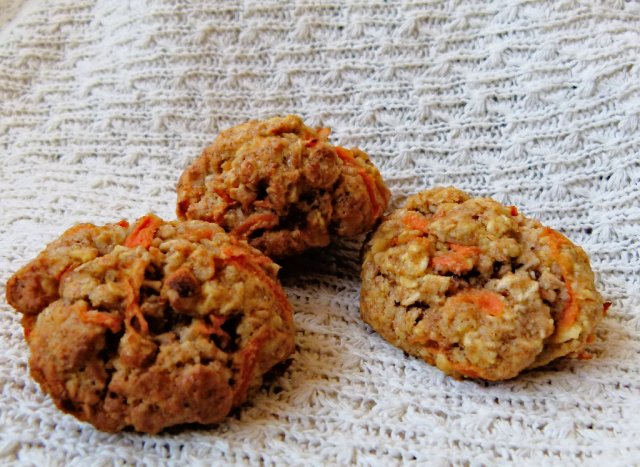
Summer is coming: Fruit, freedom and sunshine!!! But right now it’s raining – ugh! The whole time we have been stuck inside with exams the weather has been great, now we are finally done and yup, it’s going down. Okay, end of the negativity, because I have a really fast, easy and summery-breakfast to share with you guys.

Quinoa is maybe not a typical student food (because expensive), but it was on sale the other day so I thought I might try it. While being at the gym the other day I read this comment in a paper – a woman complaining about someone saying quinoa was their ‘guilty pleasure’, because obviously, how could that be? Well, this is the answer. With all the tender fruitiness, soft sweetness and bursting flavor, this feels like a treat and a healthy meal at once. The sweetness of the mango balances out the sourness of the rhubarb (no pulling faces here because you just got shocked with the immense sourness of rhubarb, I promise) and the vanilla flavor gives it an extra boost. Quinoa is extra light so you don’t feel bloated after eating (good for the bikini shape, huh?). And besides that, it is so easy to make.

P1070229_lzn
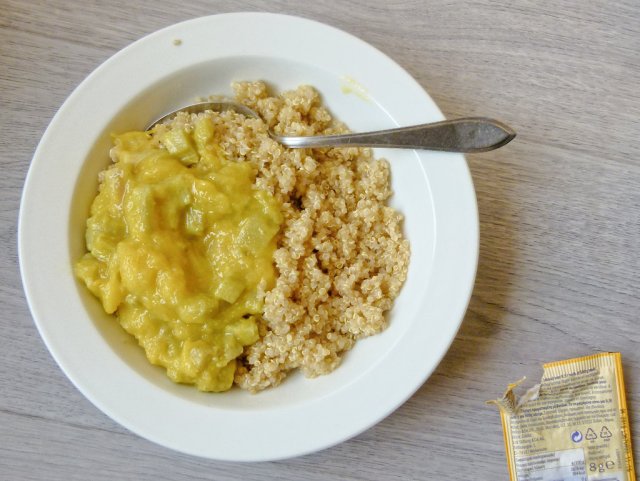
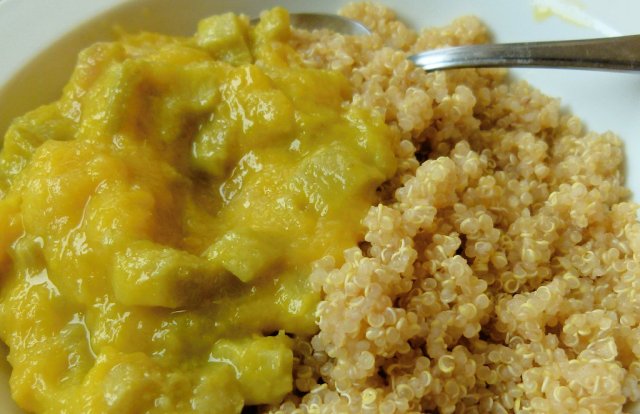
Wash your Quinoa and bring it to cook with twice the amount of water in a pot (mine cooked for 20 minutes). Then, simply cut the mango into cubes (they don’t even have to be evenly sliced), wash, peel and cut the rhubarb. Melt some butter in a second pot, add the fruits, some water and vanilla and let simmer on medium heat until the fruit are tender (check a piece of rhubarb after 10 minutes). Your compote is done, now you just need to wait for the quinoa.
When that one is done, mix it all together (some extra yoghurt, maybe?) and enjoy your plate of summer.
What’s your guilty pleasure?P1070237_lzn

With love from the student kitchen,
Johanna

Breakfast Quinoa with Mango Rhubarb Compote

  • Servings: 1
  • Print

This is what you need:
100g Quinoa, uncooked
200 ml water
2 teaspoons butter
1 stick rhubarb
½ mango
¼ vanilla pod (expensive) or 1 teaspoon vanilla infused sugar
2 tablespoons water

And this is how we do it:
1. Wash the Quinoa and set to cook on high heat with the water (it’s best to cover the pot with a lid so that it will cook faster. Don’t forget to stir in between). Cooking time is 20 minutes.
2. Cut your mango into dice.
3. Wash and peel the rhubarb. Cut it lengthwise in half and then across into small cubes.
4. In a second pot, melt the butter. Add the mango, rhubarb and vanilla /vanilla sugar and water .Cook on medium heat for 10 minutes, checking in-between if the rhubarb is tender. Don’t forget to stir, otherwise it will burn.
5. When the compote is done, remove it from the stove and wait for the Quinoa. When that one is done as well, mix with your compote (and maybe some yoghurt) and enjoy warm.

This is my own recipe. Please do not use it commercially without my permission. When using it on your blog, please re-write it in your own words and link it to the source to give proper credit:). Thanks! 

Easy Vanilla Cherry Clafoutis

IMG_20160630_140307_lzn
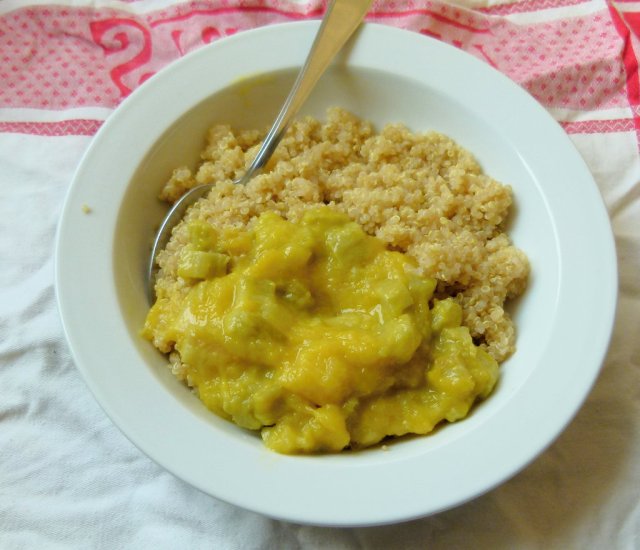
Summer has finally arrived and I am home on vacation. With this comes a change in my cooking and eating patterns (cooking sometimes for 5, sometimes for 3) that will probably also reflect on this blog. I am worried whether I will manage to keep it all up during the vacation, also because of lack of internet, time to take good pictures before people devour the food, work and travels…
But good news: I made myself an instagram. I never thought I would do that, but since it’s not for me personally but for the blog, I guess I didn’t betray myself completely. (please follow me: josbakes!!! Now, that was subtile, wasn’t it?)IMG_20160630_140329_lzn

Thus, as promised a cherry clafoutis. Our neighbours have a huge garden where they grow fruit trees, kitchen herbs and many other things that can be eaten. Growing up it was a paradise for us, mainly because they had planted what my mother refused: cherry trees. Back then the trees didn’t have that much fruit but man, that has changed. You can spend an hour picking and fill a whole bucket and come back the next few days and do the exact same thing over and over again. My sister and me picked a whole bucket (she on a ladder, making jokes about dying (not funny), me balancing on the thin branches, trying not to make the tree and her ladder shake even more).

In the end, we picked way more cherries that anyone can eat, which is why I made a clafoutis the next day. What is clafoutis? It’s basically pitted cherries in a baking pan, covered with a sort of thin pancake dough that are then baked in the oven. The dough sets, resulting in thick slices that taste like a vanilla pancake but have the soft sweetness and juicyness of the cherries as a contrast. While pancakes by themselves can sometimes be dry (imagine eating two pancakes at once), these are definitely not. Except for the pitting it requires minimum effort and it’s probably hard to do something wrong.

IMG_20160630_140341_lzn

I hope you enjoy this clafoutis as much as I do, has summer started for you yet?
With love from the student kitchen,
Johanna

Easy Vanilla Cherry Clafoutis

  • Servings: 5
  • Print

This is what you need:
350 g  (2 + 1/2 cups) sweet cherries, pitted
2 eggs
100 g  (3/4 cup + 1 tablespoon) flour
20 g ( 1 + 1/2 tablespoons) sugar
200 ml milk (3/4 cup + 1 tablespoon)
1/3 vanilla pod
butter for greasing the pan

And this is how we do it:
1. Chose a baking pan that fits all your cherries in a way that the bottom is evenly and completely covered but the cherries are in one single layer (if a few of them are on top it’s ok). Butter the pan and layer the cherries in it.
2. Preheat the oven to 175°C/ 350°F
3. Mix the eggs and milk together. Sift in the flour and stir until it’s well mixed. Mix in the sugar.
4. Slice the 1/3 vanilla pod in half. With a sharp knife, scrape out the vanilla inside and let it fall into the battern. Mix it in (you’ll see tiny specks of vanilla in the batter, but that’s how it’s meant).
5. Empty the dough into the pan with the cherries (they should be evenly covered with only the tops peaking out.
6. Bake for 35-40 minutes or until a toothpick inserted comes out clean and the top is slightly brown.
7. Enjoy warm or cold!

Leftovers can keep in an airtight container in the fridge for a few days.

This is my own recipe. Please do not use it commercially without my permission. When using it on your blog, please re-write it in your own words and link it to the source to give proper credit:). Thanks!


Rhubarb Apple Crumble

P1070090_lzn
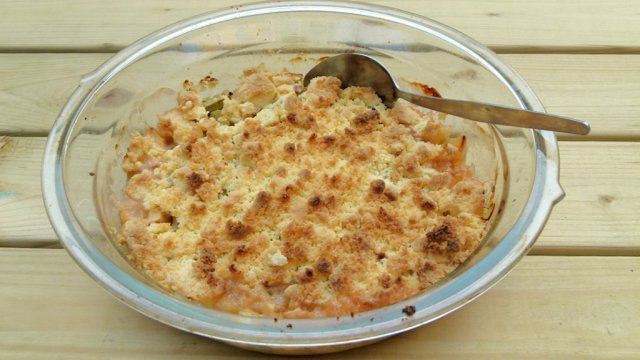
Summer is approaching and even the Netherlands got a quick burst of it. So the other day I went to the market (awesome thing, that market, fresh fruit and veggies for a really cheap price) with the intention of buying rhubarb to try out a rhubarb crumble. Well, I came back with a lot more than just rhubarb, but buying rhubarb was a premiere for me.
P1070079_lzn

This doesn’t mean I have never seen it in my life – oh no ( in contrast to my Greek roommate whom I had to show the plant to in order for him to believe I didn’t put some random thing from out of space into the food). Actually, our neighbours at home had huge rhubarb plants in their garden so my mom would make rhubarb compote ever so often – it was incredibly sour (the way my dad likes it) and I despised it. Until I tried the sweeter version my neighbours made and noticed it isn’t that bad after all (and the fun thing is, if you bite off a raw piece it gives you a really funny feeling on your teeth).

So, rhubarb crumble it is, to pretend it’s summer (for like 50 seconds, but hey).
Simply wash and peel your rhubarb and cut it into thin pieces. And that’s easier said than done. A peeler did not work in my case. What, however, did work was making a cut in the end (like cutting off the end) but not cutting off the peel on the back. Then you can grab the cut piece and slowly peel it down (like you would peel a banana), removing half of the skin at once. I hope this makes sense.

P1070083_lzn
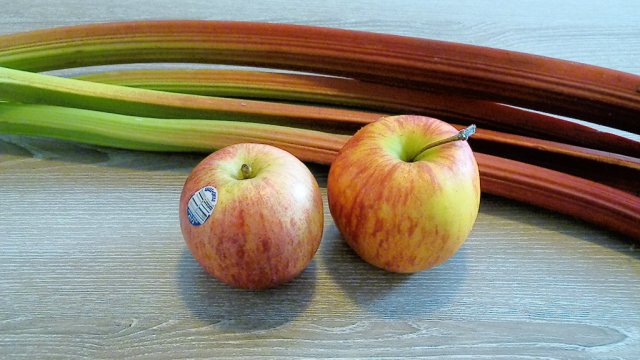
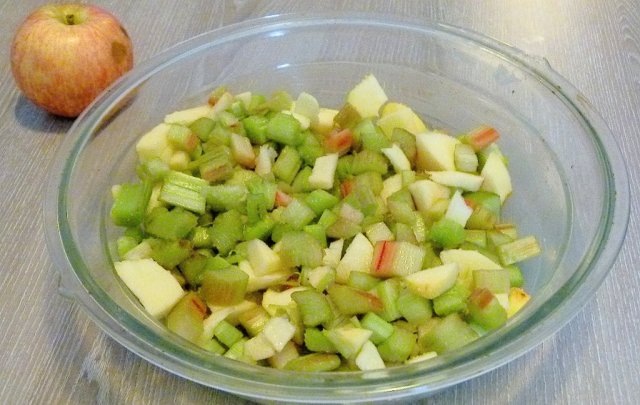
Anyways, when you’re done peeling, cut them lengthwise in half and then into evenly sized cubes. Mix with the sugar and let sit for 5 minutes.
Grease the pan, dump in the rhubarb and bake for 25 minutes. In the meantime, prepare the crumble mixture, when the 25 min. are over, crumble it over the rhubarb and let bake some more. This dish is best enjoyed when still slightly warm!

P1070096_lzn
Did you like rhubarb as a kid?

With love from the student kitchen,
Johanna

Rhubarb Apple Crumble

  • Servings: 4-5
  • Print

This is what you need
5 sticks rhubarb (roughly 500 g)
1 apple
200 g flour
90 g sugar
a pinch of salt
110 g butter, unsalted and cold
Butter for the dish
1/4 cup water

And this is how we do it
1. Preheat the oven to 180°C/350°F. Wash and peel the rhubarb and the apples. Cut them into 2 cm long squares.
2. Butter a baking dish and fill with the cut fruit. Let bake for 20 minutes.
3. While the fruit is baking prepare the crumble.
4. To make the crumble, sift flour, sugar and salt together. Cut the cold butter into the mixture and start crumbling it together with your hands until you have a crumbly mixture (basically the pre-stage of a dough).
5. After the fruit has baked for 20 minutes, add the water to the dish and crumble your crumble on top.
6. Bake for 15 more minutes (or until the crumble is golden brown).
7. Remove from the oven and let cool down slightly. Enjoyed best when still slightly warm.

Leftovers can keep in an airtight container in the fridge for a few days.

This is my own recipe. Please do not use it commercially without my permission. When using it on your blog, please re-write it in your own words and link it to the source to give proper credit:). Thanks!

Advocaat Hagelslaag (Egg Liqueur Chocolate Sprinkles) Cupcakes

P1070066_lzn

You know the moment when you really want to get rid of something? This is it. Now that I’ve opened the bottle of Advocaat for my Eierlikör / Egg Liqueur Cake it has to go. Technically, that stuff can keep for a long time (or so they say), even when opened and non-refridgerated (I don’t trust this, though). But I will be moving in a few weeks and the less I have to carry with me the better, so  this is the “let’s be creative with what we have moment”. Oh and let’s be creative with the space we have (a bathroom). Why? Read below!

Hagelslaag is a dutch thing for chocolate sprinkles (they even eat it on bread for breakfast) and together with the Egg liqueur they make the cupcakes extra flavorful. Oh, the egg liqueur.Why did I ever buy this? Oh yeah, I remember: it makes everything so moist and flavourful. Honestly, these cupcakes are so soft and moist and well,  so fluffy I’m gonna die.

P1070069_lzn

Again: super easy and simple process: Cream butter and sugar together, add in the dry ingredients and lastly the egg liqueur and chocolate sprinkles. Spoon the batter into cupcake pans Bake 20 minutes in the preheated oven, wait they are cooled down and enjoy the full fluffyness.
P1070043_lzn

And jup, this is a bathroom floor and me sitting on it (I dub these cupcakes the cupcakes made in the bathroom). The reason for this is that I made them early in the morning and since everyone has exams I didn’t want to wake people up. So…bathroom it is.

P1070075_lzn
What’s the craziest place you’ve ever cooked/baked in?

With love from the student kitchen,
Johanna

Advocaat Hagelslaag (Egg Liqueur Chocolate Sprinkles) Cupcakes

  • Servings: 12
  • Print

This is what you need:
2 Eggs
125 g butter
125 g sugar
2 teaspoons vanilla sugar
1/2 tablespoon baking powder
150 g flour
75 ml Egg Liqueur
4 Tablespoons Hagelslaag (chocolate sprinkles)

And this is how we do it:
1. Using a handheld mixer, cream butter and both sugars together until light and fluffy.
2. Add in the eggs one by one, beating well after each egg (my friend’s mom said 5 minutes per egg which is A LOT but 2 minutes is doable, right?).
3.Mix flour and baking powder in an extra bowl.
4. Sift it over the butter-sugar-egg mixture and stir with a spoon until it is just mixed in (no over-mixing please, we want this light and fluffy).
5. Measure out the egg liqueur and stir it into the batter.
6. Heat up the oven to 180°C/ 350°F.
7. Line your cupcake tins with paper liners, spoon the batter into the tins until they are 3/4 ful.
8. Bake for 15-20 minutes or until light brown and a toothpick inserted comes out clean.
9. Let cool down and feed to your hungry friend befor a wedding ceremnoy because she didn’t have dinner!

Leftovers keep in an airtight container at room temperature for 5 days.

This is my own recipe. Please do not use it commercially without my permission. When using it on your blog, please re-write it in your own words and link it to the source to give proper credit:). Thanks!

Easy Leek Quiche

P1070120_lzn
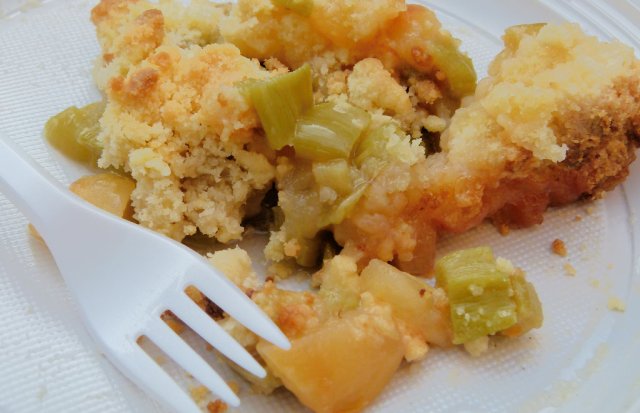
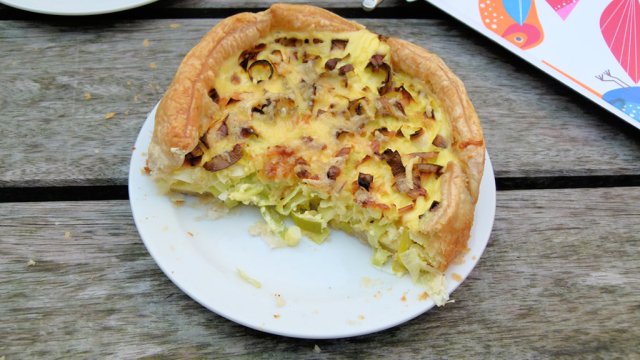
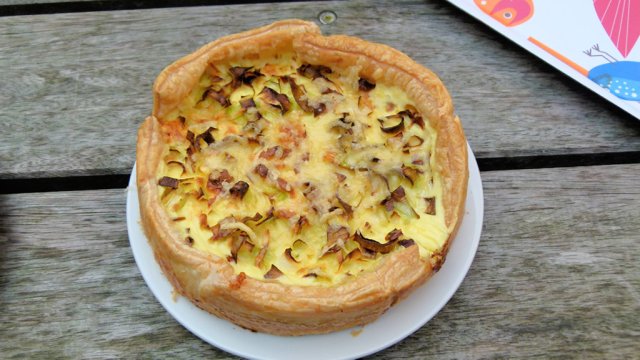
Since living in France, quiche has been one of my favorite. That buttery dough with a creamy filling…don’t even get me started. Well, apparently some of my friends here like it too (I made it for my birthday the last time), among them my leek-loving friend (the one I made the Soup with). Honestly, I tried my best to make a different kind (“I have spinach, we could make spinach and feta”). But since she was doing groceries there was just simply nothing I could do.

And I didn’t mind that much, after all, because who can say no to quiche? Apart from cutting and washing leek, whisking up some egg and creme fraiche, there is nothing you have to do. Yup nothing. Not even making dough, because we are being lazy efficient and use pre-made pastry dough. P1070107_lzn

And you don’t even need a quiche pan, a simple springform pan will be enough. While it bakes, just sit back, relax and enjoy the time with your friends and in no time, a delicious and hot dish will be one the table that will wow everyone – picky eaters included.
My friend took half the quiche home for her boyfriend and he ate it all. In one sitting. Even though he had already had dinner. Can you want any more?

P1070124_lzn

With love from the student kitchen,
Johanna

Easy Leek Quiche

  • Servings: 4
  • Print

This is what you need:
1 package (frozen) pastry dough (either the squares or a large sheet)
1 leek
200g creme fraiche (one pot)
4 eggs
One handful Gruyère (strong french cheese) plus some extra for on top
salt
pepper
A little Butter (to grease the pan)

And this is how we do it
1. If frozen, let the dough thaw.
2. Slice your leek first lengthwise (into to halves) and then into thin rings.
3. Wash the leek and let drain in a coleander
4. In the meantime, whisk together eggs and creme fraiche. Stir in the cheese and season with salt and pepper (you really want to season it well)
5. Stir in the leeks.
6. Preheat the oven to 200°C/ 390°F
7. Grease your pan with butter. Line with the pastry dough (you really want to make sure the bottom and sides are covered, cut them to fit if necessary and dab the borders a bit with your fingers to make everything stick together.
8. Bake in the oven for ca. 30-35 minutes (depending on the height of the quiche, if it’s higher it can take up to 45 minutes). When it looks like it’s done (the egg mixture is set, light brown on top), sprinkle some more cheese on and bake for another minute or until the cheese is melted.
9. Enjoy slightly warm.

Leftover quiche keeps in an airtight container in the fridge for about 3 days, it’s also good when eaten cold.

Eierlikör / Egg Liqueur Cake

P1070051_lzn
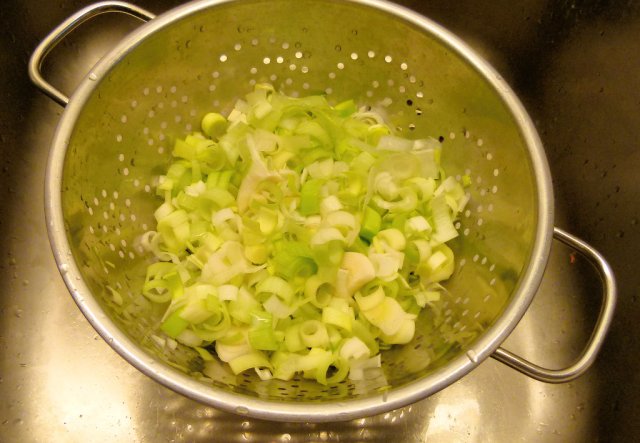
And boom, before you notice it, examtime is almost over which means saying goodbye (at least temporarily) to some of the friends you have made over the year. May was my baking month (with three multiple layer cakes for a friend’s birthday that I will some day show here as well, hopefully) and I said to myself ok, this is it, I am done baking until the end of the semester.P1070061_lzn
Well, that lasted long, didn’t it? Guilty on all grounds. A hockey team collegue is going to the Phillipines for some time and threw a little goodbye-party. Since they’ve all been drooling about my cakes (mean me posted them in the whatsapp group chat), I promised her a cake. I actually wanted to make a fancy one with a phillipine-theme but a wedding got in the way, so I chose for a dutch thing as a special ingredient: Advocaat.
P1070047_lzn
Also named egg liqueur, Advocaat is a thick, yellow drink made mostly out of, surprise, eggs and alcohol. Even if you don’t drink, you can use this in your baking, since the alcohol evaporates throughout the baking process. Just omit the glaze in that case though (or substitute the advocaat for something else).

Advocaat gives the cake its rich yellow colour, supermoist texture and unique taste. Honestly, it’s so soft an spongey you totally forget how much butter and sugar is in there. Not heavy at all!. My team members could not stop eating (but hey, they’re sports-people, they can do that, right?).  The process is very simple: Just cream butter, sugar and eggs togehter, add the dry ingredients and lastly the egg liqueur. Traditionally, this cake is baked in a Guglhupf pan, but I simply used a small Springform pan (18 cm)  with a tube in the middle. Works as well.

When the cake is done and cooled down, top with the glaze. I chose to decorate the plate with blue m&ms because it’s our team colour.
Dear M&M fabricants: please make the colours even in the bag. I had to dig through the whole thing to find enough blue m&m’s for a single plate.
P1070056_lzn

Which one is your favorite m&m colour?
With love from the student kitchen,
Johanna

Eierlikör / Egg Liqueur Cake

  • Servings: 12
  • Print

This is what you need for the cake (18 cm / 6 x 4 springform with a hole)
3 eggs at room temperature
185 g Butter at room temperature
185 g sugar
1 package vanilla flavored sugar (1 tablespoon)
225 g flour
2  teaspoons baking powder
130 ml Advocaat (or other egg liqueur)

And for the glaze:
1.5 Tablespoons egg liqueur
100 g powdered sugar

And this is how we do it
1. Using a handheld mixer, cream butter and both sugars together until light and fluffy.
2. Add in the eggs one by one, beating well after each egg (my friend’s mom said 5 minutes per egg which is A LOT but 2 minutes is doable, right?).
3.Mix flour and baking powder in an extra bowl.
4. Sift it over the butter-sugar-egg mixture and stir with a spoon until it is just mixed in (no over-mixing please, we want this light and fluffy).
5. Measure out the egg liqueur and stir it into the batter.
6. Heat up the oven to 180°C/ 350°F. Grease your pan with butter.
7. Spoon the batter into the pan until it’s 3/4 full (not more, otherwise it will overflow!) and bake for ca. 40-45 minutes. You might have to cover it with tin foil after 30 min. to prevent it from getting too brown. You can test with a toothpick for doneness: when no crumbs are attatched it is done!
8. Remove from the oven. After 5 minutes, remove the outer ring of the springform. Let the cake cool down on the bottom completely.
9. When completely cooled down, transfer to a plate.
10. Prepare the glaze by whisking the ingredients together. Drizzle over the cake and enjoy!

Cake can be stored in an airtight container at room temperature for 2-3 days.
Recipe by me with inspirations from Mara Hörner

Red Pepper Quadriple Veg Pasta

P1070036_lzn
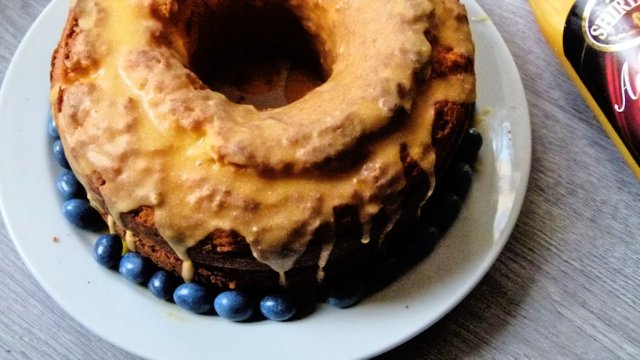
It has been said that I don’t live as healthy as I proclaim to do and I get where it’s coming from – a little bit due to exam times and also because I do cook, but then I eat it and when the plate is empty I think back and am like “wait a minute, you had a job to do” (can anyone relate to that?).

But this time, I did my job (so proud): This is one of my standard recipes to get a full load of veggies on a stressful evening.Stressful meaning  waiting for an organisational skype call with 20 people (yes, 20, and it’s possible if all the people who are not speaking turn off the microphone). However, they were a little late to call so I just remembered to take a picture of this little something that’s not even really worth calling a recipe because it’s so easy. Peppers, Carrots, Spinach and Tomatoes marry beautifully with a tomato-oregano sauce and are spiced up with some red pepper powder and onions (be careful on that one though, the flavor really develops after a few minutes of cooking). Sometimes, I just make a recipe for 2 without the pasta and eat it as a veggie bowl (light and tasty, but filling at the same time), but if you have someone you are sharing this with you might want to add some carbs (or just a quadruple load of veggies).
P1070035_lzn

A little close-up so you can see all that veggie goodness. What I love is that all pieces are roughly the same size-even the pasta fits. And again, it’s easy: Cook the pasta, fry the veggies , add the tomato sauce, season with salt, pepper and red pepper and let thicken down for a few minutes. Drain the pasta, add the sauce and tadaa, dinner is ready.P1070040_lzn

Do you prefer spicy or non-spicy sauce?
With love from the student kitchen,
Johanna

Red Pepper Quadriple Veg Pasta

  • Servings: 2
  • Print

This is what you need:
250 g pasta, uncooked
1 onion
1/2 red bell pepper
2 medium size carrots
a handful cherry tomatoes
3 handfuls spinach
350 ml (1 1/2 cups) canned tomato sauce
salt
pepper
oregano (dried or fresh)
red pepper powder (I used about 1/4 teaspoon)
oil for frying in the pan

And this is how we do it:
1. Cook the pasta according to package instructions.
2. While the paste is cooking, peel the carrots and cut them, wash the other veggies and cut them (except for the spinach) into evenly sized pieces (you can cut the tomatoes in half).
3. Heat up 1 tablespoon of oil in the frying pan on medium heat. First, fry the onions until they turn glossy-transparent, then add in the carrot pieces. Fry while stirring for about 5 minutes. Add in the pepper and cherry tomatoes, fry for another 3 minutes.
4. Add in the spinach and, while stirring, let wilt down.
5. Add the tomato sauce to the pan. Season with salt, pepper, dried oregano and, in the end, the red pepper powder (you really want to be careful on that one, the effect becomes stronger. It’s best if you add small amounts, stir, wait for a few seconds and then taste a little of the sauce). I used about 1/4 teaspoon.
6. Turn down the heat and let the sauce slightly simmer until the pasta is done.
7. When the pasta is done, drain it in a coleander and serve hot with the sauce.

Leftovers keep in an airtight container in the fridge for about three days.

This is my own recipe. Please do not use it commercially without my permission. When using it on your blog, please re-write it in your own words and link it to the source to give proper credit:). Thanks!

No Effort Nutella Almond Rolls

P1070008_lzn
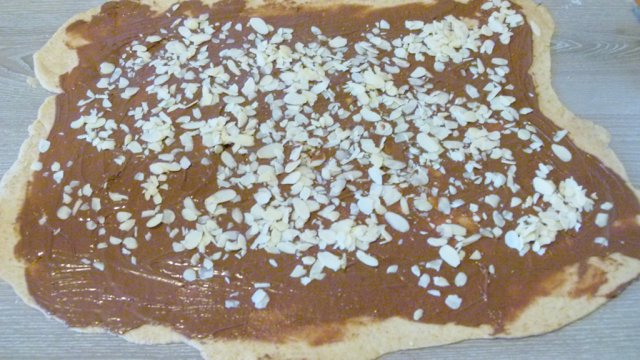
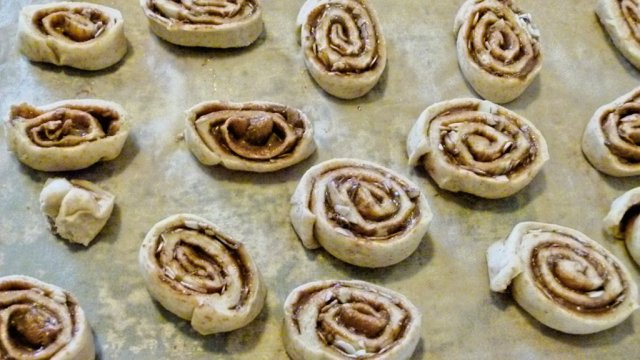
Examtimes do crazy things to everyone. Bad weather does crazy things to me. Examtimes AND bad weather? No good combination. The weather has been really bad the last few days (kinda warm, but kinda not, and always raining) and in combo with exam time this leads me to  any measure I can find to not go crazy (eating Nutella with a spoon, anyone?).

So I figured since I am eating with it anyways I might as well bake with it (the logic behind this is nonexistent, but hey) and out came these Nutella Almond rolls. Now let me tell you, it’s Nutella at it’s finest. Soft, chewy dough with Nutella and some crunchy almond pieces for interesting texture and taste. Heaven in circles, I’d say. And the perfect anti-stress measure. If you were really lazy/stressed/not feeling like baking, you could probably use some pre-made yeast dough (crescent rolls, anyone?), but even with homemade dough these are really quick and easy to make and will guaranteedly cheer up your mood!
P1060996_lzn

After making the dough and letting it rise for 30 minutes (only 30 minutes, guys), the only thing you will have to decide on is the thickness of the dough: if you want rolls that are a little more crispy, you might want to roll it out thinner (plus it yields more rolls). If you want thick, chewy rolls, the dough needs to be thicker. That’s it. Just slather that nutella on top and sprinkle with some almonds.

Roll up from the long side (if you want more, but thinner rolls) or the short side (fewer, but thicker, since the diameter of the roll is bigger). Cut into equal size pieces (about 1.5 cm wide), transfer on a baking sheet.P1060999_lzn

Now you really want to spread them out enough because those will spread – hello, yeast!

P1070007_lzn
And faster than you can think they are done – proudly under display in the bad light of our kitchen counter because somewhere you gotta get light from. And I won’t judge if you drizzle them with some extra Nutella for added anti-crazy-going-ness!

What’s your favorite stress food?
With love from the student kitchen,
Johanna

Effortless Nutella Almond Rolls

  • Servings: 15 rolls
  • Print

This is what you need:Title75659092
500 g (2 cups) flour
1 pck active dry yeast
1 pinch of salt
75 g (5 tablespoons) Butter
250 ml (1 cup) milk – non dairy works too
1 pck (1 tablespoon) vanilla sugar
75 g Sliced almonds
4 Tablespoons Nutella

And this is how we do it:
1. In a bowl, melt the butter. Once melted, stir in the milk and keep stirring until it is well-mixed.
2. In another bowl, mix all the dry ingredients
3. Add the wet to the dry ingredients. First, stir with a spoon to roughly incorporate everything, the knead the dough with your hands until a uniform dough forms. Knead for another 10 minutes to allow pockets of air to form.
4. Cover the bowl with the dough with a clean cloth and let it rest for 30 minutes.
5. Preheat the oven to 180°C/ 350°F.
Take the dough out of the bowl. on a floured surface, roll out the dough into a rectangle (for softer rolls, the dough has to be 1 cm thick (=0.3 in), if you want to get more rolls/thinner layers you can also spread it out more.
6. Spoon your Nutella into a bowl. Give it two short bursts of 10 seconds (not more, otherwise it will burn and get hard) in the microwave so it will be more fluid.
7. Spoon your Nutella onto the dough, making sure you cover everything. Sprinkle the almonds on top.
8. Roll up your dough beginning at the long side of the rectangle (if you begin at the short side, this will result in fewer, but thicker rolls).
9. With a very sharp knife, cut the dough roll in slices (about 2 cm/0.6 in) thick. You should get about 15 rolls. Place on a baking sheet lined with parchement paper, being careful to leave enough space in-between.
10. Bake the rolls for 20-25 minutes or until golden brown. Take them out of the oven and let them cool down. When cooled, drizzle them with some more melted Nutella and enjoy.

Rolls can be kept in an airtight container at room temperature for a few days. However, since this is yeast dough, they are best enjoyed on the day they were made!

This is my own recipe. Please do not use it commercially without my permission. When using it on your blog, please re-write it in your own words and link it to the source to give proper credit:). Thanks!